Summer Popsicle Stick Art

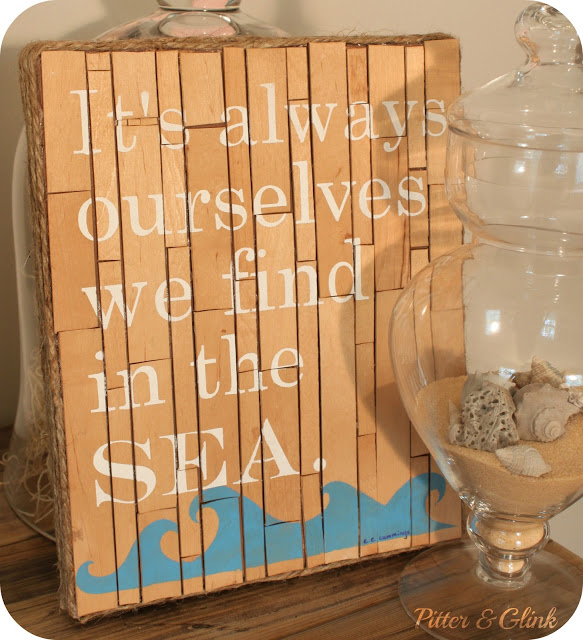
Bethany blogs at Pitter and Glink. Given the challenge to create something using only items she already had, Bethany decided to raid her popsicle stick stash! She used them to make a beautiful piece of nautical art. Perfect for summer!

pitter and glink before

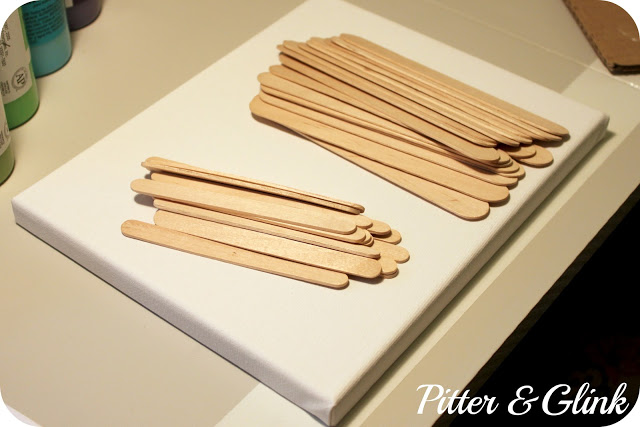
To start out, Bethany cut off the rounded ends of the popsicle sticks, then laid them out on a canvas. She cut the sticks at different lengths and fit them together, much like hardwood flooring. Once she had the sticks arranged in a pattern she liked, Bethany boiled tea bags to stain the wooden popsicle sticks. While letting the sticks soak in the stain, she painted the canvas brown so white wouldn’t show through the gaps between sticks. After drying the popsicle sticks on paper towel, Bethany hot glued them onto the canvas. Using a stencil, she painted the last line from an E.E. Cummings poem and a wave onto her wooden canvas. To finish the edges, Bethany hot glued rope as she wrapped it around the canvas. I’d better hang on to my popsicle sticks this summer! I love this idea!

pitter and glink after

You can learn more about Bethany’s popsicle stick art at Pitter and Glink.

Pretzel Container to Nautical Vase

Over at 21 Rosemary Lane, Barbara has been looking for ways to decorate her back patio without using glass. Since the patio floor is concrete, glass decor is an accident waiting to happen. Inspiration for a nautical vase came from an unlikely source, as Barbara shares, “Last week the kids and Chris polished off one of those big containers of pretzels, but I wouldn’t let them toss out the actual container…I had an idea.”

21 rosemary lane before

Barbara began by washing out the container. Next she removed the paper label, glue and all. Then Barbara sprayed on two coats of white spray paint. After the paint dried, she sprayed the bottom of the soon-to-be-vase with spray adhesive, then wrapped jute twine around the bottom of the container and around the threads of the container’s mouth. A few nautical knots in more twine tied around the middle of the container was the finishing touch! Barbara’s unbreakable new vase is certainly a beautiful addition to her patio! I guess I’d better start eating pretzels!

21 rosemary lane after

You can find the step-by-step process for this nautical vase at 21 Rosemary Lane.

Patriotic Mason Jars Centerpiece

At Mason Jar Crafts Love, Linda shares her love for Mason jars and all the creative possibilities they provide. Recently she decided to take three old Mason jars and make them into a patriotic centerpiece for the Fourth of July!

mason jar crafts love before

To transform her jars into an Old Glory-inspired centerpiece, Linda started by painting two jars white and one jar blue with acrylic paint. On the two white jars, she taped off stripes with washi tape and painted on red stripes. Linda made her own star stamp by attaching rubber stars she found in the kids’ section at the craft store on top of an old wine cork. She stamped white stars onto the blue jar, then used a bit of sandpaper to give all three jars a distressed finish. I think these jars are the perfect way to add patriotic pride to any table, don’t you?

mason jar crafts love after

Learn more about how Linda painted the Mason jars at Mason Jar Crafts Love.

Thrift Store Belt to Camera Strap

Wilma blogs at By Wilma. When she wanted a new strap for her camera, she found inspiration at the thrift store! A braided leather belt turned out to be just what she was looking for to create a new strap.

by wilma before

First, Wilma cut off the ends of the belt, leaving the pieces of leather sewn at each end attached to the belt. Then she folded two pieces of ribbon, and used textile glue to hold the ends together. Wilma cut open the two leather end pieces, inserted the ribbon loops, and secured them with more textile glue. After the glue had dried, Wilma used two jump rings to attach the new strap to her camera. Don’t you love the added personality Wilma’s new strap has? I’ll be keeping my eye out for braided belts now!

by wilma after

You can find out more about how Wilma made her camera strap at By Wilma.

Ugly Canvas to Statement Art Print

Over at Girl Loves Glam, McKenzie tells us, “My mom works at a home decor store…When my mom told me she had some huge, ugly canvases that I could have for FREE, I jumped on the offer!” McKenzie knew she could give those sad flowers a makeover and transform the canvas into something much more functional for her home- a large canvas print of her family picture.

girl loves glam before

First McKenzie had an engineer’s print made of the photo she wanted to use at the same dimensions as the canvas. Then she cut the flower canvas off of its frame and lined up her photo on the other side. After discovering a few methods that didn’t work (mod podge and glue), McKenzie tried attaching the photo with black duct tape. To her surprise, pulling the print tightly while taping it down was the way to go! Not only did the duct tape adhere the print to the canvas, it made the perfect border for her black and white photo! Great idea, McKenzie!

girl loves glam after

You can find out more about how McKenzie attached her print to the canvas at Girl Loves Glam.

Ombre Penny Art

Pennies. It always seems like I have too many of them, whether scattered in random corners of the house or jangling in my purse. Luckily, Kristen of My Covered Bridge found the perfect way to use too many pennies: by turning them into a statement art piece!

my covered bridge before

Kristen started with a clearance frame she found at a craft store and a bunch of leftover pennies. She lined up her pennies to form an ombre gradient, from bright and shiny to dull and weathered. After taking the frame apart, she dry-fit the pennies to the backing, then super-glued the pennies in place. That’s all it took for Kristen to create a beautiful but inexpensive piece of art to hang in her kitchen! What a brilliant idea! Now I know what I’ll be doing with that cup of pennies I’ve been saving!

my covered bridge after

You can find out more about Kristen’s project at My Covered Bridge.

Men’s Polo to Women’s Bow Shirt Refashion

Lisa blogs at Grey Luster Girl. When her dad gave her an XL striped gray polo shirt he’d never worn, she knew it was meant for more than sitting in a man’s closet. So Lisa decided to refashion it into a cute, feminine bow shirt.

grey luster girl before

The first step in the transformation was to unpick the collar, which Lisa saved to use for the bow later on. Next she cut off the sleeves, put the shirt on inside out, and pinned up the sides so she could take them in to fit her body. Lisa used sleeves from one of her own shirts as a pattern to fashion smaller sleeves out of the existing ones, then sewed the new sleeves back on the shirt. To make the bow, Lisa sewed strips using fabric left over from the sleeves and sewed them onto the collar. Can you believe what a lovely shirt she ended up with? I’m off to raid my husband’s closet now, what about you?

grey luster girl after

You can get step-by-step directions for Lisa’s bow shirt at Grey Luster Girl.

Beat-Up Old Dresser to Stylin’ New Accent Table

Over at Evolution of Style, Jenny had a Craigslist dresser in need of some love. “The bottom drawer did not work very well at all, and veneer was chipping off,” she admitted.

evolution of style before

So Jenny proceeded to turn her sad, beat-up dresser into one lovely lady of an accent table! She removed the bottom drawer altogether, creating an open shelf, then painted the wood white. Adding pretty vintage drawer pulls was Jenny’s finishing touch to give her old dresser a brand new life! Can you believe it’s the same piece of furniture? I had to look twice, what an exciting transformation!

evolution of style after

Learn more about Jenny’s dresser makeover at Evolution of Style.