Easy Halloween Project Made from Milk Jugs

Can we have one more Halloween upcycled project before the day is over? Here’s another one that you are going to want to save for future use. It comes from Sweet Haute, who came up with with this craft using items that you probably already have on hand. Empty milk jug, anyone?

Sweet Haute milk jug before

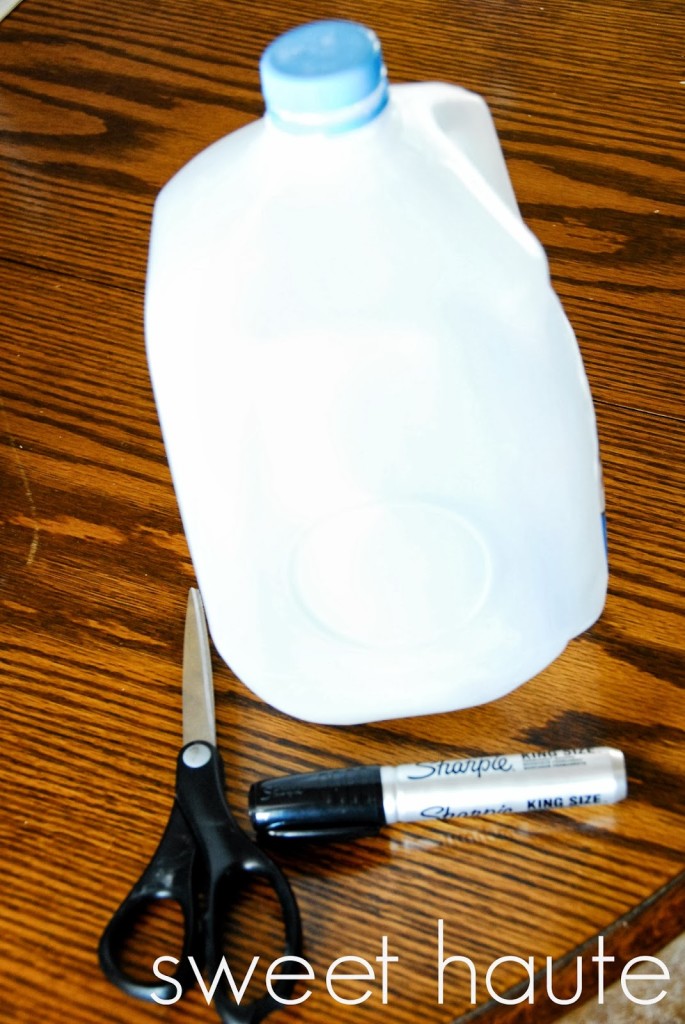
This project is so safe and easy that even the kids can do it. Simply take a few empty milk jugs and draw some Halloween faces on them with a black permanent marker. Take a string of white lights and arrange them so that some of the lights are inside the jugs. Sweet Haute put hers into flowerpots, to help them stay upright. The result is glowing ghosts! Too cute, and a great last-minute decorating project.

Sweet Haute milk jug after

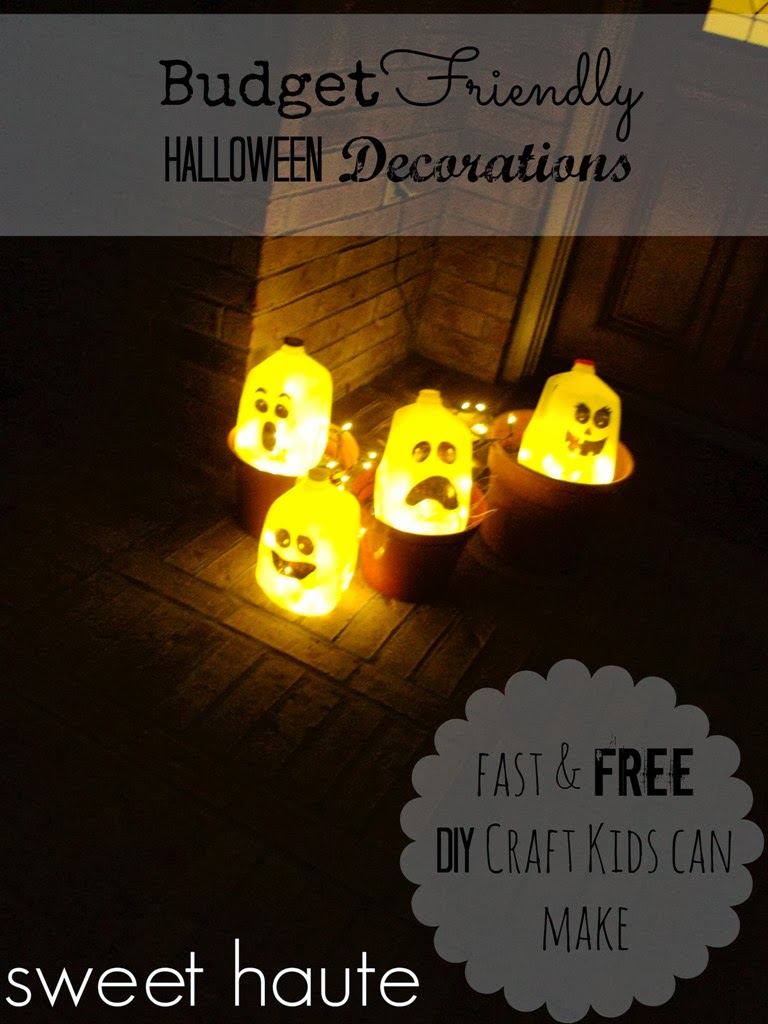
Get all the details on this project at Sweet Haute.

Halloween Centerpiece with Witch Shoes

Emily blogs over at The Benson Street. She came up with an adorable Halloween centerpiece that made use of several things she already had on hand…and I bet that you have some of the same supplies or could find them easily.

The Benson Stree halloween centerpiece before

That old pair of boots gave Emily the idea for this project. She pulled them out of the closet and gave them a few coats of purple spray paint topped with glitter. A painted cake stand became the base for this decoration. Emily made legs to fit in the shoes by sewing simple fabric cases and stuffing them so full of batting that they stay upright! She created a printable (that you can download) that is the perfect finishing touch to this vignette. This is too much fun!

The Benson Street halloween centerpiece after

This really is a fun idea for Halloween decor that you can enjoy looking at today and file away to make next year. Get all the details from Emily at The Benson Street.

Go for the Gold! Giving Accessories a Midas Touch

At Grace Lee Cottage, Leah has a new-found appreciation for gold. “It all began with my outdoor fall decorating and a single can of metallic gold spray paint,” she confesses. “Now every time I turn around I find something else I think might look nice with a coat of gold spray paint!”

Grace Lee Cottage vase before

Recently, Leah decided that a few touches of gold would look great against the navy blue walls of her bathroom. One of the accessories to get the Midas touch was the glass cylinder vase, pictured above. After taping off an interesting geometric design on the vase, she simply sprayed it with Valspar’s metallic gold paint. When the paint dried, Leah says, “I picked up a few twigs from behind our house and placed them right in my new vase.” The rustic twigs combined with the modern vase is a really pleasing combination. Looks great, Leah!

Grace Lee Cottage vase after

Find out more about this accessory upcycling project at Grace Lee Cottage.


Updating a Childhood Dresser for the Next Generation

Abby from Just A Girl and Her Blog admits that she took this dresser with her when she moved away from home, and never gave it back. It’s currently housed in her sons’ bedroom, which is undergoing a makeover. Abby decided to give the dresser a new look, too.

Just a Girl and Her Blog dresser before

Since the new bedroom is getting what she calls a “subtle transporation theme”, Abby took a cue from some of the striped dressers she’s seen on Pinterest lately and applied some stripes. In this case, she and her husband taped off just one side of the dresser to add vertical racing stripes. They used an fun orange shade, “Pumpkin Patch” by Behr, for the stripes. I love the way the knobs on that side of the dresser are included in the orange stripe. Adorable!

Just a Girl and Her Blog dresser after

Get more details on this dresser that was spared for another generation of use at Just a Girl and Her Blog.

How to Keep Your Laminate Counters Off the Curb

Chelsea, the Pinterior Designer, has been working on updating the kitchen in her home to suit her personal style since the day she bought the house. I think a lot of us can relate to just how much work it can be to update a kitchen on a budget! Chelsea had done just about everything she could to the kitchen without a demolition: painting the cabinets and walls, updating appliances. Everything looked so much better, but somehow the laminate counters looked worse.

Pinterior Designs countertops before

Since her dream quartz countertops are still a long way in the future for Chelsea, she decided to try painting her existing laminate ones. She purchased a Rustoleum counter coating kit, and went to work. The result Chelsea achieved was terrific! Her kitchen got a huge style upgrade for a very low cost, and the existing counters will enjoy a few more years out of a landfill. Way to go!

Pinterior Designer countertops after

Get all the details on the refinishing process over at Pinterior Designer.

Coco keeps track of her projects at A Dash of Coco. When she spotted this bench on her neighbors’ curb, she was torn. It’s the dilemma of many a roadkill rescuer when faced with neighborhood roadkill: grab it and run, or ask for permission to turn their junk into something fabulous? In Coco’s case, she went and asked for it, and they neighbors were beyond thrilled to let it enjoy a new life at her house. Hooray!

A Dash of Coco bench before

Back at home, Coco started the makeover with a good sanding. Next, she applied Miss Mustard Seed’s milk paint in “Grain Sack”. A cushion made from fabric remnants dresses up the bench and totally complements the blue-gray tone of the bench. “I think she looks much better on my porch than the side of the road,” Coco says happily, and I definitely agree!

A Dash of Coco bench after

See more pictures of this rescued bench at A Dash of Coco.

Upcycling Fourth of July Decor to Autumn Prettiness

When Barb from Second Chance to Dream spotted this metal door basket at Goodwill, it had been marked down so far that it was almost free. It was sporting stars and stripes that had seen better days.

Second Chance to Dream door hanging before

Since Barb didn’t need door decor for any upcoming patriotic holidays, she decided to put this knic-knac to use for Fall. She gave the tin a coat of paint in a warm, golden shade. Once that dried, she used shape tape to lay out horizontal chevron stripes, then painted over the shape tape with rust colored paint. Inexpensive silk flowers arranged in the door basket complete this project. Doesn’t it look great?

SEcond Chance to Dream door hanging after

Find out more about this seasonal decor rescue at Second Chance to Dream.