Dated Artwork Becomes Pretty Corkboard

DeDe from Designed Decor decided that it was time to give this date piece of artwork new life. Since she wasn’t using it as it was, Dede turned it into something that she could use: a corkboard.

Designed Decor corkboard before

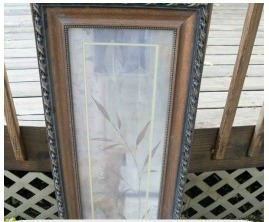
To repurpose this framed art, DeDe took apart the picture and removed the glass insert. She painted the ugly brown parts of the frame with Sherwin William’s “Gray Area.” She decided to paint her cork insert the same color, which really dressed up the corkboard. To beef up the corkboard a little, she used some foam batting underneath the cork. “I decided to use it to hang jewelry,” DeDe says. “I needed a new display piece for my shop, so this one was it.” Looks great!

Designed Decor corkboard after

Get all the details on this artwork repurposed into a pretty corkboard at Designed Decor.

Keep Little Hands Busy With an Acorn Craft

Do you have kids home for the holiday break and a few acorns leftover from your fall crafting? Then here’s a fun little craft project to keep the kids busy for a little while, brought to you by Anu of Nalle’s House.

Acorns

Anu had plenty of help from her young son on this project. They pulled the tops off of a few acorns, and he painted them red. Once the red paint dried, he added small dots with white paint. Anu used hot glue to attach the acorn hats back onto the acorns. With the polka dot tops, they look like little toadstools! A few of the acorn toadstools were turned into necklaces by drilling holes near the top and stringing twine through them. Others were left as-is to display on shelves in their house. ” I think these toadstools would make a super cute garland, too,” Anu points out. What a cute idea, and a fun way to spend some time crafting with your kids!

Nalle's House acorn toadstools after

Click over to Nalle’s House to get all the details on these adorable toadstools made from foraged acorns.

Lighting Dark Winter Nights with a Scrap Wood Lantern

Over at One Dog Woof, ChiWei had an abundance of scrap wood and a terrific idea: turn those scraps into a lamp! If you’d like to make a similar project, she recommends using pieces of wood with straight sides and corners.

One Dog Woof scrap wood lantern before

For her lamp, ChiWei gathered her scrap wood and cut it into assorted small pieces. After sanding each piece, she began arranging them into groupings that would form the sides of the lantern. ” I pieced mine together so each piece sort of depended on the piece before it, and everything was slightly adjustable. Also, it is helpful to create a 90 degree frame to build up against, so you know your panel will be square,” she explains. Once she had the blocks arranged, ChiWei glued them together. She cut a base for the lamp and installed a a basic lamp kit. The result is a beautifully unique lantern-style lamp that will be perfect for long, winter nights.

One Dog Woof scrap wood lantern after

Visit One Dog Woof to get all the details on this project.

Updating a Country Bench

Most Roadkill Rescuers would agree, it’s hard to pass by anything made of solid wood. So you’ll understand completely why Sara from Thrifty Treasures had to bring home this sad little bench she found.

Thrifty Treasures bench before

Along with the paint splatters, it was probably the hearts on this bench that were causing it to show it’s age. “I decided I could cut the heart out and the bench would still be solid enough to remain a bench,” Sara says. It worked! After remodeling the legs, she painted it with Beach Glass by American Paint Co. paint and coated it with dark wax for some rustic appeal. To further transform this bench, Sara upholstered the seat with some pretty striped fabric in coordinating colors. It looks like a completely different bench!

Thrifty Treasures bench after

Visit Thrifty Treasures to get more details on this makeover.

Upcyle Toilet Paper Tubes into New Year’s Eve Party Favors

Taryn from Design, Dining and Diapers shared this festive upcycling project at Kleinworth & Co. She started out with a pile of empty cardboard toilet paper tubes.

Design Dining & Diapers new year favors before

To turn the cardboard tubes into pretty favors, Taryn started by cutting festive silver wrapping paper into strips. She wrapped a strip of paper around each tube, securing them at one end with a ribbon. Next, Taryn dropped treats inside the tubes through the open ends, before tying them off with ribbon, too. She created a fun celebration label to stick on each favor, which you can download for free. This is a simple, low-cost favor that you could easily share with family and friends as you welcome 2014.

Design Dining & Diapers new year favors after

Get all the details on this DIY party favors made from toilet paper tubes at Kleinworth & Co.

Tossed Table Becomes a Stylish Bistro Set

One cold day when Karin and her husband were out on a walk, they spotted this old table sticking out of a dumpster at their neighbor’s house. With permission from their neighbor, they fished the table out and took it home. Karin-who blogs at Art is Beauty-knew that with a lot of TLC and a couple of chairs, it could become a trendy bistro table!

Art is Beauty table before

After locating two chairs and making some minor repairs to the table, Karin got started on the makeover. She sanded down the finish on all three pieces, then restained and refinished the tabletop. Karin painted the chairs and the table’s pedestal with CeCe Caldwell Chalk Paint’s color “Slate”. It was a perfect match for the Liberty of London style fabric she’d found on a bolt at Goodwill and used to upholster the chair seats. Karin loves to add flair to her refinished pieces, so she selected a vintage graphic into a stencil and applied it to the table top with turquoise craft paint. The color of the graphic brought out subtle touches of turquoise in the chair fabric. It’s a stunning transformation, don’t you agree?

Art is Beauty bistro set after

Learn more about the makeover process for this bistro dining set at Art is Beauty.

Rawr! It’s a Tiger Striped Bar Cart

Everyone except Jenna who passed by this metal cart on the curb saw it as another piece of junk. Jenna, on the other hand, could see the potential it had to become a sexy bar cart. If you need a fabulous rolling bar in time for your New Year’s Eve celebration, check out this rescue at Rain on a Tin Roof.

Rain on a Tin Roof bar cart before

“After sanding a few rusty spots and getting aluminum foil unstuck that had been there for no telling how long, I gave it a coat of primer, then a few coats of coral spray paint,” Jenna explains. The next step was placing the tiger stripe stencil on the top shelf of the cart and filling it in with gold paint. She used Royal Designs paint in Antique Gold, along with a dabbing brush made by the same brand. Jenna used antique gold Rub ‘n Buff to spiff up the legs of the cart. She styled it to the nines, and this cart is now ready to ring in the New Year!

Rain on a Tin Roof bar cart after

See more fun pictures of this tiger striped bar cart makeover at Rain on a Tin Roof.

Milk Paint Makeover of a Nightstand

Over at Revived by Delia, Delia says that she’s had this nightstand waiting in a pile of furniture that needs makeover for so long she doesn’t even remember where it came from. “Judging by the coat of dirt it was covered in, it had been neglected for some time,” she notes.

Revived by Delia nightstand before

Once the dust was cleared away, Delia realized that it was a sturdy little table that wasn’t in such bad shape. She decided it was the perfect, low-risk piece of furniture on which to try a type of paint that was new to her: Old Fashioned Milk Paint in Federal Blue. Before applying the first coat of milk paint, Delia had planned to layer several colors of paint onto this nightstand. When she realized that the milk paint was going to work some serious magic on this dresser, she realized that other colors weren’t necessary. Instead, she used coconut oil to add some resist spots on the piece. Don’t you love the way it turned out?

Revived by Delia nightstand after

Visit Revived by Delia to get the details on Delia’s coconut oil resist technique.