New Purpose for an Old Dresser

Remodelaholic shares this awesome repurposed dresser by Laura Beth of A Step in the Journey. When this hand-me-down dresser was no longer needed as a TV console in her home, Laura Beth decided it was time for the vintage dresser to have a new purpose and a new look.

dresser-before


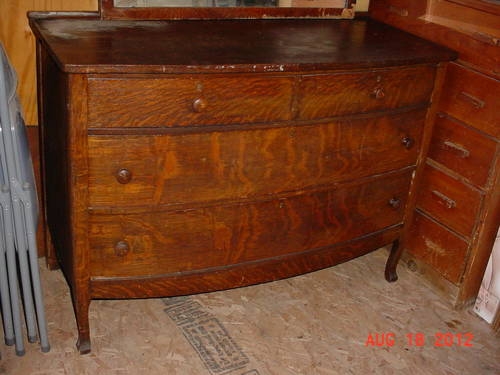
The dresser had great bones, but a worn finish, so the first step in the makeover was paint. Laura Beth painted it taupe with playful, white chevron stripes on the drawers. Since the dresser’s new purpose would be serving as a kitchen buffet, the next step was adding a butcher block top….without the cost of actual butcher block. Laura Beth purchased sanded plywood, glued it to the top of the dresser, and gave it the look of butcher block with alternating stripes of stain. Incredible!

chevron-butcherblock-dresser-kitchen-island


This is a really detailed makeover, so make sure you click over to Remodelaholic to learn all about it.

Cardboard Tube Napkin Rings

Christina blogs at I Gotta Create. She crafted some cute napkin rings that are just perfect for an Autumn tablescape. And you’ll never guess what she made them out of: toilet paper tubes!

Empty Toilet Paper Rolls

As it turns out, those empty cardboard tubes are just the right circumference to use as napkin rings. Christina cut hers down to a more napkin-ring-like size. She wrapped raffia around the ring to disguise its humble origins. Next, she used a leaf shaped puncher/embosser to cut pretty maple leaves out of the cardboard, which she layered over the raffia. The leaves are the perfect spot to add a name, letting these napkin rings double as place holders, too! Aren’t these great?

cardboard-tube-napkin-rings

Visit I Gotta Create to get all the details on this fun upcycling project.

From Paint Cart to Sophisticated Kitchen Island

Needing more counter surface in her kitchen, Meg of Oliver & Rust did some online window shopping for a small island or kitchen cart. She fell in love with one at William-Sonoma, but the pricetag was way out of reach. “After not getting or finding what I want, I was huffing in the garage and saw my paint cart-formerly the little island in our first home,” Meg says. “The top was covered with paint but the size was perfect.”


The former island was a seven year old Ikea Bekvam kitchen cart. Meg removed the original, paint splattered butcher block top, replacing it with carrara marble. She painted the rest of the cart using dark gray milk paint. A towel bar added to the side is made from vintage brass towel holders and a piece of electrical conduit. Doesn’t Meg’s new kitchen cart look amazing?


Get all the details on this makeover by visiting Oliver & Rust.

Old Window Becomes an Industrial-Chic Chalkboard

You may have spotted this project by Mindy of My Love 2 Create over at Knock Off Decor. It’s one she originally shared at My Repurposed Life. She started out withan old window that a friend had passed along to her.

old-window-frame

Inspired by Restoration Hardware’s industrial chalkboards, Mindy decided to turn the old window into a chalkboard. After removing all of the hardware, she painted the glass with several coats of chalkboard paint. Mindy cut some fake rivets out of chipboard and attached them to the corners of the window frame for an industrial vibe using glue and upholstery tacks. Once the faux rivets were in place, she used several different colors of spray paint to give the frame the look of rusted metal, and her industrial-style chalkboard was complete. How awesome is that? I can’t even tell it’s not actually metal!

industrial-style-chalkboard

Find out more about this project by visiting My Repurposed Life.

Gilded Gathered Acorns

Here’s a fun, cheap, and easy project you can make for a little Fall glitz. And this time of year, it’s easy to find the main component for this quick autumn project from Architecture of a Mom: acorns! “You can recruit your kids to collect the acorns,” Rachel suggests.

collected-acorns

Once you’ve gathered acorns, it’s important to prep them properly so they won’t get wormy indoors. Rachel recommends baking them in the oven for a couple of hours. After her acorns cooled, she brushed the nuts with liquid silver gilding. She left the caps natural on hers for a fun, rustic contrast to the metallic nuts. These make a fun addition to your Fall decor that can last for years to come.

silver-gilded-acorns

Click over to Architecture of a Mom for more details on this Fall craft.


Pallet Pumpkins

Over at Little House of Four, Katie had some pallets lying around and decided to put them to use for some rustic Fall decor.

wood-pallets

Katie pulled a few boards off of one of her pallets and went to work cutting them into various small sizes of squares and rectangles. Next, she layered the pieces in stacks, creating somewhat round shapes that resembled pumpkins. Katie glued her stacks together with wood glue, and then painted them white. She topped each pumpkin with a twig stem. I think these are so cute for Fall decorating!

pallet-wood-pumpkins

Visit Little House of Four to get all the details on these DIY pumpkins.

Cute Wood Pumpkins from Architectural Salvage

Kathy of Petticoat Junktion picked up a box of these decorative wood square corners at a yard sale a while ago. They are meant for adding to trim and molding for extra pizzazz. She’s had them sitting around in her workshop, and finally figured out what to do with them.

wood-squares

This is such a great idea: Kathy turned those little squares into pumpkins! She painted the squares pumpkin orange. Then Kathy glued some twigs to the top of each square, effectively giving her “pumpkins” some stems. Next, she embellished them with ribbons and burlap. Aren’t they the cutest little pumpkins?

wood-square-pumpkins

Find out more about this project by visiting Petticoat Junktion.

Rag Wreath for Fall

Melanie from Find It Make It Love It shared this cute rag wreath for Fall at The Ribbon Retreat. You can make one like it with fabric scraps from your stash.

vintage-fan-grill

Instead of purchasing a wire wreath form, Melanie repurposed a vintage fan grate when she made her rag wreath. It adds a quirky, rustic vibe to this project. She notes, “The amount of fabric needed and the number of strips will really vary depending on the size of your wreath form and how full you make it.” Melanie used just two colors but you could use just about any number of fabric that look good together. Too cute!

Fall-Fabric-Rag-Wreath

Click on over to The Ribbon Retreat for a full tutorial.