Book Page Halloween Art

You might be checking out this post in between passing out candy to the trick-or-treaters…..I get it, it’s a little late to fit in one more Halloween craft. But this one was just too good to pass up, so pin it now and consider it for later, mmm-kay? Katie from View From The Fridge shared this book page art at Juggling Act Mama.

dog-chewed-book

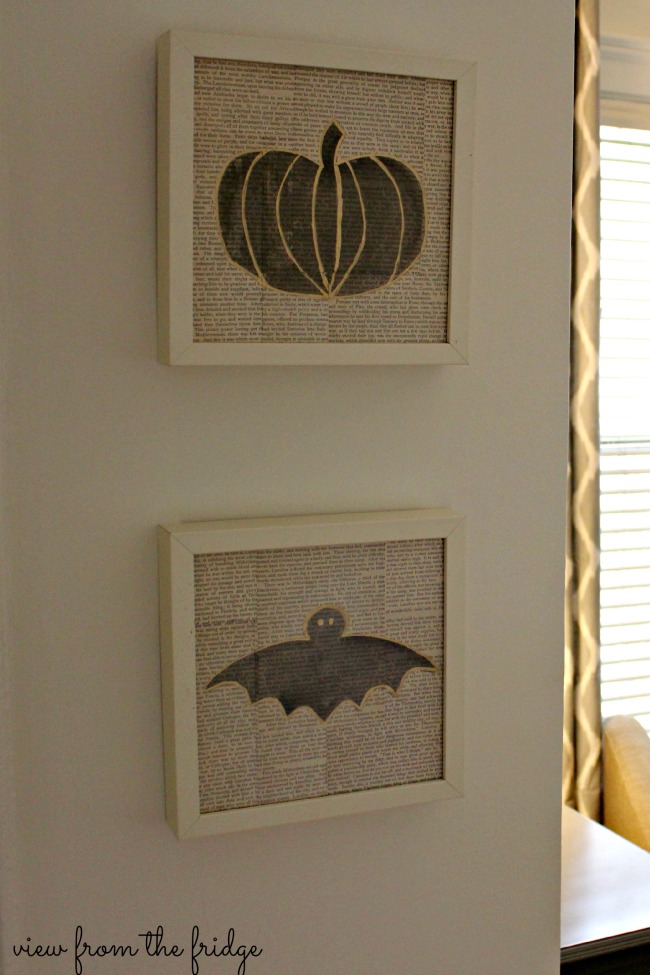
“I’m on a kick recently with book page projects because of our dog, Molly. She seems to have it out for our books lately, and every couple days or so she paws one out of our bookshelf and rips it up,” confesses Katie. For this project, Katie cut and pasted the pages from one of those chewed books to fit a couple of thrifted frames she had on hand. She painted some simple Halloween silhouettes onto the pages with her kids’ watercolor paints, outlining them with a gold paint pen after they dried. The Halloween art looks terrific!

Book-Page-Watercolor-Halloween-Art

Get more specifics on this Halloween craft by visiting Juggling Act Mama.

Haunted Birdcage

Happy Halloween, today! How about if we start off the day with a spooky decoration from Trish at Uncommon Designs? She made this from a decorative birdcage from the 1990’s that was desperately in need of an update.

90's-birdcage-decor

Well, this might just be considered a make-under-for a good cause! Inspired by Alfred Hitchcock’s The Birds, Trish decided to go full-on creepy with the update. She layered on craft paint to achieve a crackled effect. Filling the birdcage with moss and having a small flock of black birds around the outside of the cage completed the vignette. {Chills!}

weathered-wood-birdcage-halloween-decor

Visit Uncommon Designs to get the scoop on how Trish achieved that cool crackled finish on the birdcage.

Chair Revival

Stacy and Eric blog at Anastasia Vintage (click over to read the very cool story behind their blog name). A Craigslist curb alert led them to this chair….which had definitely seen better days.

nasty-curbside-chair

It took some serious elbow grease and a good paint stripper, but Stacy and Eric were eventually able to remove the plastic-y layer of paint that coated the solid wood frame of the chair. They created a custom color of chalk paint for this chair that they explain as, “Neutral enough to compliment lots of color schemes, with just enough lilac to give it some punch!” A replaced and reupholstered seat cushion in matching damask completes the new look.

carved-occasional-chair-refinished

Find out more about this lovely chair revival at Anastasia Vintage.

New Look for a Nightstand

Kristi of My Weekly Habit tells us, “I had a sturdy but dated nightstand that was given to me by my mother-in-law as part of a set for our spare bedroom. When I changed our spare bedroom over to an office, I had some homeless furniture.” Instead of kicking it to the curb, Kristi decided to give it a makeover.
old-nightstand

Since this was a low-stakes makeover, Kristi decided to experiment with making her own chalk paint. She chose a soft gray for the paint color, brushing it onto the nightstand, then topping the chalk paint with wax to give it a slight sheen. Pretty, new knobs finish the piece. What a transformation!

refinished-nightstand-gray

Visit My Weekly Habit to learn more about this nightstand makeover.


Stumped? Try Gold

Over at Thrifty & Chic, Alicia shares her love of tree stump furniture, saying, “It’s a great conversation piece. And they are cheap! The cheapest piece of furniture I own.”

tree-stumps

Alicia founder her stumps on the lot of a local tree removal service, and she has several other recommendations for where to find them if you don’t have any sitting around in your own backyard. She also has some good tips for figuring out weather or not your stumps are seasoned. After removing the bark from her stumps, Alicia sprayed them first with stain blocking primer and then with the finishing top coat. I just love the solid-gold look of this stump table!

gold-tree-stump-side-table

Find out more about how Alicia makes tree stump furniture at Thrify & Chic.

Beachy Pallet Project

“My sweet and amazing husband surprised me with some pallets out in our garage,” says Courtney fondly at Crafts By Courtney. “Who needs flowers when you get a pile of pallets to craft with!” Who indeed? Courtney’s first project was to add a little bit of the beach to her Florida home.

pallets-starfish

After ripping her pallet apart, Courtney nailed two of the pieces together to create a sign-like background. She left the wood as it was, loving the weathered color and texture. She hot glued some faux starfish from the craft store onto her sign. Don’t they look amazing against the old wood?

starfish-pallet-art

Get all the details on this project when you visit Crafts By Courtney.

Broken Dresser Lives Again

Karen spotted this broken dresser on one of her tree lawn hunts for furniture. Despite it’s poor condition, she brought it home for a makeover, and tells us all about it at The Salvaged Boutique.

broken-dresser

Once the grime of years of neglect had been scrubbed away, the dresser’s primary concern was a lack of drawers. A quick Pinterest search inspired Karen to replace the missing drawers with shelves. She painted the dresser black and added some pretty fabric to the back of the open shelves. Mercury knobs on the remaining drawers complete the new look. Karen tells us, “We loved the idea of using it in a bathroom for towels and other toiletries, but it would also be great as a small TV stand, a bar cabinet or a book shelf.”

upcycled-dresser-refinished

Head over to The Salvaged Boutique to read all about this makeover.

High Style Halloween

At her blog One O, Chiara tells us that she wanted to create some Halloween decor that would fit her personal style. Her requirements, she explains, included “something that has a nordic geometric touch and feel. Something not too spooky or horrific but pretty more cute and stylish.” If that sounds like a tall order, then you must read on to see how Chiara made it happen.

scrap-wood-boo-sign-supplies

Chiara’s solution to her Halloween decor dilemma was to create a string art “boo” sign from scrap wood. She pounded nails partway into the piece of wood to form the letters for her sign, then sprayed the whole thing white. Using black string, Chiara wrapped string around and across the nails of each letter to form cool geometric shapes. The result is a 3-D sign with a very modern vibe. Spooktacular!

string-art-boo-sign

If you are interested in making a sign like this, visit One O to follow Chiara’s helpful tutorial.