DIY Bedsheet Teepee

Aniko from Place of My Taste wanted to add a fun element to her little boy’s bedroom. And what’s more fun than your very own teepee? (Answer: pretty much nothing.) Opting not to spend $150 or more, Aniko instead used an old duvet cover for what she calls an “inexpensive, easy and YOU CAN DO IT TOO project!”

For this no-sew(!!) project, Aniko drilled holes into eight wood slices, then fastened them together with twine to form the teepee base. She cut a twin-sized duvet lengthwise to form one huge rectangle. Then she cut the sheet into smaller pieces and hot-glued each one to the frame. Her homemade giant pom poms were the perfect finishing touch. Aniko and her kids are in love with the new teepee, and so am I!

See the complete instructions at My Place of Taste.
TV Tray Revamped as Eye-Catching Outdoor Table

Katie from Fun Home Things almost tossed this old TV tray, which had just been taking up garage space. The tray got a last-second reprieve when she decided to turn it into a great addition to her deck.

As Katie tells us, this makeover was pret-ty darn involved: “I didn’t sand it, didn’t use primer…I didn’t really do any prep work on it at all.” She just wiped it down, let it dry, and started spraying with a glossy aqua paint that had been waiting for the perfect project. After two coats Katie was done and had fallen in love with her “new” table. Great call, Katie!

See more about this rescue at Fun Home Things.

Pallet-Inspired Coffee Mug Rack

Laura from My Newest Addiction kept seeing really cute coffee mug racks made from pallets, but did not love the $100+ price tag they came with. Instead, she created a version of her own! (Secret spoiler alert: you don’t even need a pallet to make this!)

After a search for a pallet left her empty-handed, Laura’s husband mentioned the scrap wood in the garage and offered to “nail some boards together in a pallet-like shape.” Once her “pallet” was assembled, she spray-painted the base color (a copper foil) and her letters. After her second color went on, Laura used sandpaper to help the “other shade pop out and give it a pretty, worn look.” She attached her letters and hooks and voila! I’m betting her mornings are at least 67% better with this beauty greeting her in the kitchen.

See the complete instructions at My Newest Addiction.

From Boring to Beachtastic: Outdoor Pillow Makeover

Now that the weather is getting warm, Gina is excited to enjoy the great outdoors on her new porch chairs. Her one problem is that “the pillows they came with were so dull & sort of ho-hum.” Luckily, Gina had a pair of old couch pillows hanging around “for just an opportunity like this.” She’s showing us at Kleinworth & Co how she upcycled them into a set of new, eye-catching outdoor pillows!

Instead of spending $30 each for pillows in the “beachy colors” she wanted, Gina found a set of seat cushions in her favorite color. She cut out the stitches, took out the interior cushions (you know, to save for the future!), and stuffed her old couch pillows inside. Then she hand-stitched the opening. Gina says, “for less than $20 I was able to revamp these old pillows with something I can actually tie on to my chairs so they don’t blow away.” Pretty sure all the genius points go to her!

See the complete instructions at Kleinworth & Co.

Rustic Industrial Caster Coat Rack

Joan from Scavenger Chic loves old wall hooks, “especially when they are made out of something unexpected.” She snagged a bunch of casters from her junk pile and combined them with scrap wood to create a fabulous coat rack with a stylish rustic industrial vibe! Joan used a pallet and old window molding to provide the wood pieces she needed. She gave the wood a light coat of paint, then nailed the boards together. After drilling holes for the casters, she glued them into place. Now she has a great-looking new piece that’s ready for work “in a mudroom, bathroom, guestroom or a kid’s room.” Nice job!

See the complete instructions at Scavenger Chic.

Clothespin Necklace Holder

Over at Our Peaceful Planet, Nancy is sharing an “an organizer and a craft! BONUS!” She’s found on a great way to display jewelry using leftover clothespins. I bet this easy craft would be a hit with the tweens/teens in your life!

Nancy painted a wooden plaque left over from a previous project, then painted her clothespins a contrasting color. She glued jewels from a broken bracelet onto the clothespins for that extra bit of sparkle, then glued the clothespins onto the board. All that’s left to attach is a picture hanger for the back of the plaque and you’re in business. And in case we weren’t impressed enough, the necklaces Nancy is displaying are homemade too!

See the complete tutorial at Our Peaceful Planet.


Kids’ Craft: Necktie Rattlesnakes

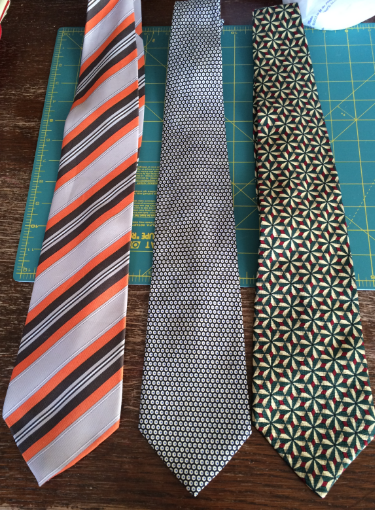
Maria blogs at Sew Travel Inspired. A recent vacation to see her grandchildren in New Mexico inspired this fun craft project that upcycles old neckties. “I took my grandchildren to visit the American International Rattlesnake Museum in Old Town Albuquerque,” Maria explains.

mens-ties

Noticing how the shape of a necktie was very similar to the shape of a snake, Maria gathered some old ties and helped her grandchildren turn them into playful snakes! They attached eyes to the lower, wider ends of the ties to form snake faces. Maria pulled the seam out at the skinny end of the ties so there would be an opening there that the children could help push stuffing into. She stitched the ends closed and helped the kiddos add forked tongues to finish off their new snake friends. Adorable!

See the full tutorial for this fun kids’ craft at Sew Travel Inspired.

Beachy Bird Feeder

Emily from Table and Hearth received a challenge to create something amazing from a 2×4 and gift it to a new homeowner. Challenge accepted! Emily decided to dip into her large seashell collection “to make a cute, beachy, shabby, bird feeder” as a housewarming gift for her friend’s new cottage.

The shells need to have a bowl shape to hold seeds, so Emily went with lightning whelks. She tried a new-to-her technique for treating the 2×4 and was thrilled with the results: “One coat of simple white paint, sanding, then wiping on some stain and that’s it!” She screwed the feeder’s legs into the underside of the board, and then very carefully drilled holes into the bottoms of the shells and screwed them into the board. As a final considerate touch, Emily screwed a hook into the board to hang a suet cage, in case any visiting feathered friends happen to be suet lovers. I’m sure her friend is going to love this!

See the complete tutorial at Table and Hearth.